Creating a sandbox test environment with BackupExec and Veeam
by Richard Warren, Senior Systems Engineer at Computelec
In this series of two posts, I will run you through my processes and experience in creating a sandbox test environment with Backup Exec and Veeam.
This came about because we are currently in the process of upgrading our Microsoft Dynamics GP server from 2010 to 2015, and I was asked to provide a developer with access to the 2010 server in a sandbox environment, for upgrade testing. ‘OK, not too hard’, I hear you say…
Because we have VMware, and Dynamics runs on a physical server, it was really a question of how best to virtualise it.
Once virtualised, we needed to think about:
- How best to provide access to it
- How to give Dynamics access to the domain controller it will need to operate
- And finally, how to provide internet access to the Dynamics server in order to test the Salesforce connector functionality
Given that we use Veeam to back up most of our servers (all but the one physical server) I already knew that I would use a Vlab and SureBackup Job to create the sandbox environment. Also, given that Backup Exec is already used to back up the Dynamics server, I thought ‘why not try and use Backup Exec to create a virtual copy?’.
The first part (creating the virtual copy using Backup Exec) turned out to be pretty straight forward, and I will go through the steps and findings in a moment. The second part (creating the sandbox environment) was not as straight forward as I had expected – but you will have to wait for my follow up post if that’s what you’re searching for!
A look at Backup Exec 2014 and Dynamics
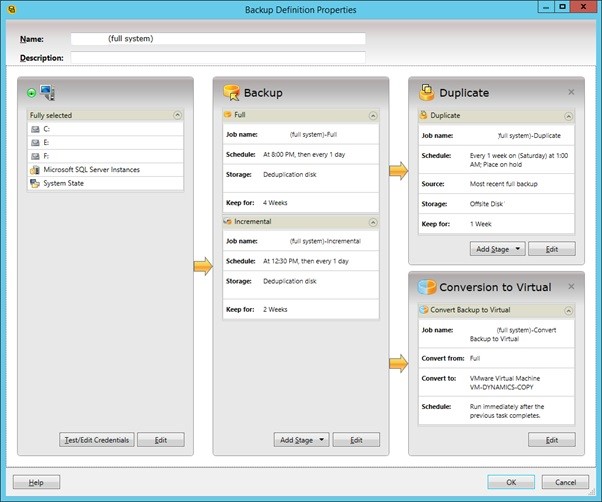
We already had a standard backup job for the physical Dynamics server, with a full and incremental backup to a deduplication storage folder. A new feature in BackupExec 2014 is ‘Convert to Virtual’, so I decided to try that.
The first decision was whether to use B2V (Back-up to Virtual) or P2V (Convert to Virtual). You may wonder about the difference – fortunately Symantec have published a Technical White Paper to explain it in detail, but basically B2V runs after the backup job has completed whereas P2V runs in parallel with the backup job.
I didn’t want to slow the job down so I went with B2V. To do this, I just needed to add a ‘Backup to Virtual’ stage to the backup job, which would leave the production machine unchanged by the process.
Server Requirements
There are some requirements the server must meet before you can perform a virtual conversion, which might put the brakes on in many cases;
- Basic disks only, not dynamic
- NTFS or FAT32 only
- MBR volumes only, not GPT
- No clustered servers
Having passed those checks, it’s a green light to move ahead.
You will need at least a full backup job of the server you want to virtualise. Add a stage from the button on the Full backup stage – “Convert to Virtual Machine after backup”, then change the schedule to “immediately after source task completes”.
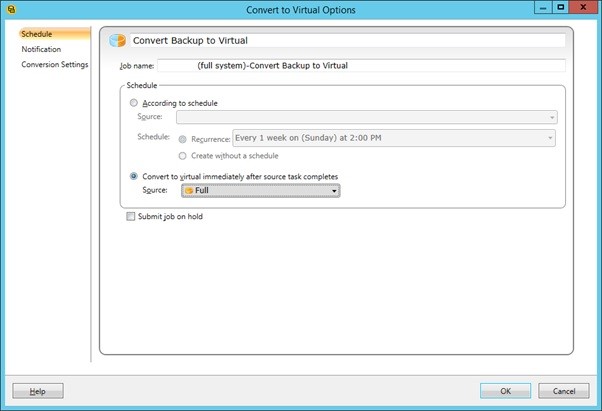
On the ‘Conversion Settings’ tab you can choose to convert for Hyper-V or VMware ESX.
Enter the required connection settings for your host or vCentre server, and a destination virtual machine name. Here you can specify the memory and CPU’s to be allocated to the virtual copy. On the ‘Disk Configuration’ tab you can choose the location (datastore) of each virtual disk, and whether it is thin or thick provisioned. You cannot resize the disk.
You will also need to specify the location of VMware tools for your version of VMware, which means downloading it to the BackupExec server, and specifying the location in the job properties. BackupExec will automatically install the tools during the B2V process. When finished, your backup job will look something like this:
So what happens next?
After the job runs, and assuming everything is set up right, you will end up with a new VM. You can start it up and log on to the console, and it looks exactly as you would expect. You’re going to have to check your network settings, but don’t connect the vNIC to your production network.
The VM powers up and down normally, can be snapshotted, vMotioned and storage vMotioned all without an issue.
I disabled some of the hardware monitoring agent services that were causing high CPU usage in the guest VM. I also removed surplus vNICs – the source server had 4 physical NICs bonded into a team. I left a single NIC in the guest and reapplied the IP address in Windows.
So now we have a fully functional VMware copy of the physical server, we can back it up with Veeam and use that backup in a SureBackup job. Also, don’t forget to put the Backup Exec B2V stage on hold if you don’t want to overwrite your VM copy.
In part 2 of this post I will cover how to create a vlab and SureBackup job in Veeam. The vlab will have 2 isolated networks, as the domain controller needed in this sandbox lab is on another VLAN.